


No matter the temperature where you are, spring is almost here! While April showers may have started early and May flowers seem a little far away, you can bring the season to yourself by adding these spring-inspired art pieces and decorations to your home.
DIY Spring Centerpiece With Farmhouse Flair

For our first piece, we’ll keep it simple — a nice farmhouse-inspired centerpiece! You’ll need a stained wood box, which you can either purchase or create and stain yourself if you’d like. (A galvanized metal rectangle would also be cute, but we digress.) Ensure the container is large enough to hold 2–4 mason jars or similarly-sized glass jars. Place the jars in the container, and then purchase (or pick!) some spring flowers to put in the jars. You’ll want to choose spring-themed colors, like pink, yellow, or even orange! Add in lots of greenery to complete the aesthetic, and ta-da! You’ve got the easiest spring centerpiece that’s still sure to wow.
DIY Butterfly Tree Art Piece

Curly willow branches are commonly used to fill vases, and offer a unique decor aesthetic on their own. Elevating them with springtime elements is just the cherry on top! Use a shallow vase and anchor some curly willow stems to the bottom. Some people just use small stones to support them, but you may find a touch of hot glue to the base helpful as well. Top the rocks with a little bit of moss to create a more earthy look. You can then find watercolor butterfly printouts online and print them onto cardstock. (Another more complicated option involves using actual watercolor paints and a butterfly-shaped sponge to stamp the shape onto paper and then cutting.) Hot glue mini clothespins to the middle of a folded butterfly cutout, and then pin to the pieces of curly willow! This art ensemble is great as a stunning centerpiece, but also functions just as well as a normal art piece to replace any other seasonal decor you had out for winter.
DIY Floral Paper Lanterns

Whether hosting a brunch or just looking to decorate around the house, these flower paper lanterns from PaperPapers are a great way to bring some simplistic elegance to your home. Using the link provided, print out the cutting stencil. Trace it onto white metallic cardstock, and then cut. You’ll be able to assemble them using any adhesive, though hot glue would likely be easiest! You can even add white translucent paper to cover the “windows” of the paper lanterns for a more sophisticated look. Add tea lights into each lantern, but make sure they’re battery powered — don’t want anything catching on fire! Finish off the look by surrounding the lanterns with a floral arrangement, most notably something pink like cherry blossoms!
DIY Eggshell Flower Centerpiece
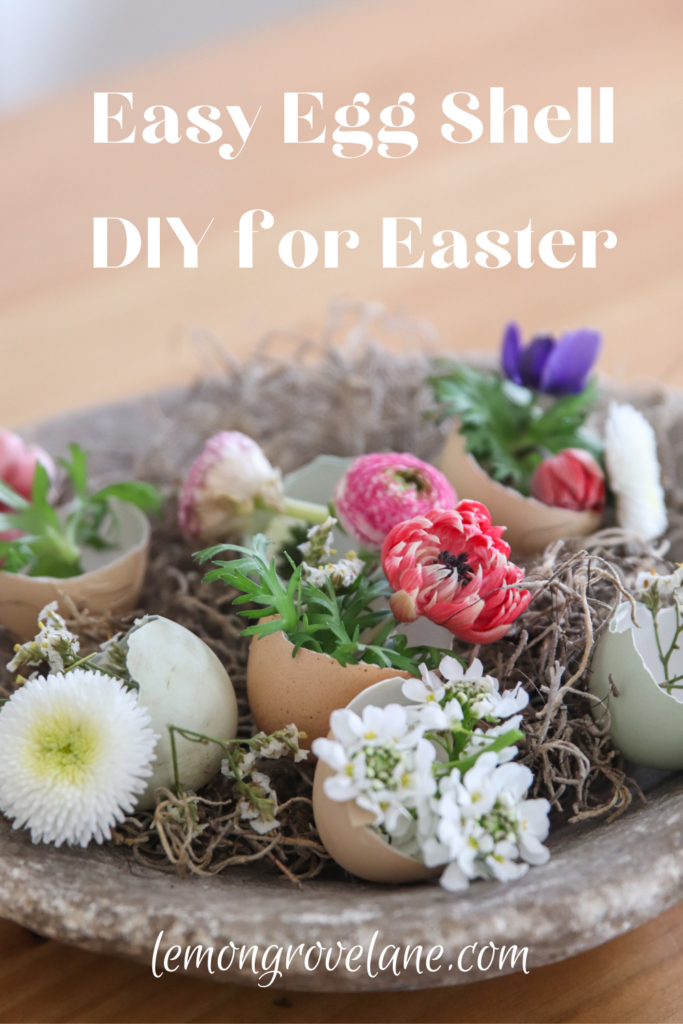
When you think of Easter, you likely choose to decorate with eggs around your home...but why not crack ‘em open? It turns out that egg shells have their purposes in DIY crafting as well. Carefully remove the inside of the egg by poking a finger-sized hole in the top. (Feel free to eat the egg; waste not, want not!) Gently rinse the inside, and even dye them if you’d like! Then, use a spray-painted egg carton or other egg holder to place the shells, and fill them with decor. Fresh flowers with their stems mostly trimmed away are most popular. Use them to spice up a centerpiece or set the table for Easter dinner!
DIY Floral Monogram

Taking a springtime wreath concept to the next level is the floral monogram, tutorial by Daisy Mae Belle. To make this floral masterpiece, start with a piece of cardboard. Sketch out the letter you’d like to make (bubble-letter style!). Cut blocks of floral foam to fill in the general shape, and then use floral pins to secure each block together. Lay a sheet of chicken wire over the foam, and trim until the wire is a few inches larger than the monogram using wire trims. Carefully fold the wire around the edges of the floral foam, and then use floral wire to wrap the chicken wire around the shape. This will give it its final stability. From there, cut real or fake flower stems to be quite short, and push them into the floral foam! Arrange as you see fit with springtime colors and greenery. This project looks gorgeous on the front door with a family surname letter!
DIY Mason Jar Chandelie

The best part about spring? Finally getting back outside to enjoy the weather! After months of extreme cold (plus a year of quarantining), making some DIY art to hang on your patio, porch, or in your backyard is a great way to show the change of the seasons. A “chandelie” is a word that combines candles and chandeliers, creating a piece that looks like a chandelier from afar but is actually lit by tea candles. MidwestLiving’s candelie tutorial uses a shallow basket tray, Mason jars, a flower pot, and chain to turn ordinary objects into beautiful decor. Connect chains to your basket tray, and then connect them together using a chain connector. A rope can be attached to this to hang it from a tree or patio hook. Fill the bottom of the mason jars with birdseed (about 1–2” worth), and then place a votive candle inside. Line the bottom of the basket with moss, and then add the mason jars around the edges. The flower pot can be filled with flowers and placed in the middle to raise the petals above the candles.
DIY Flower Chandelier
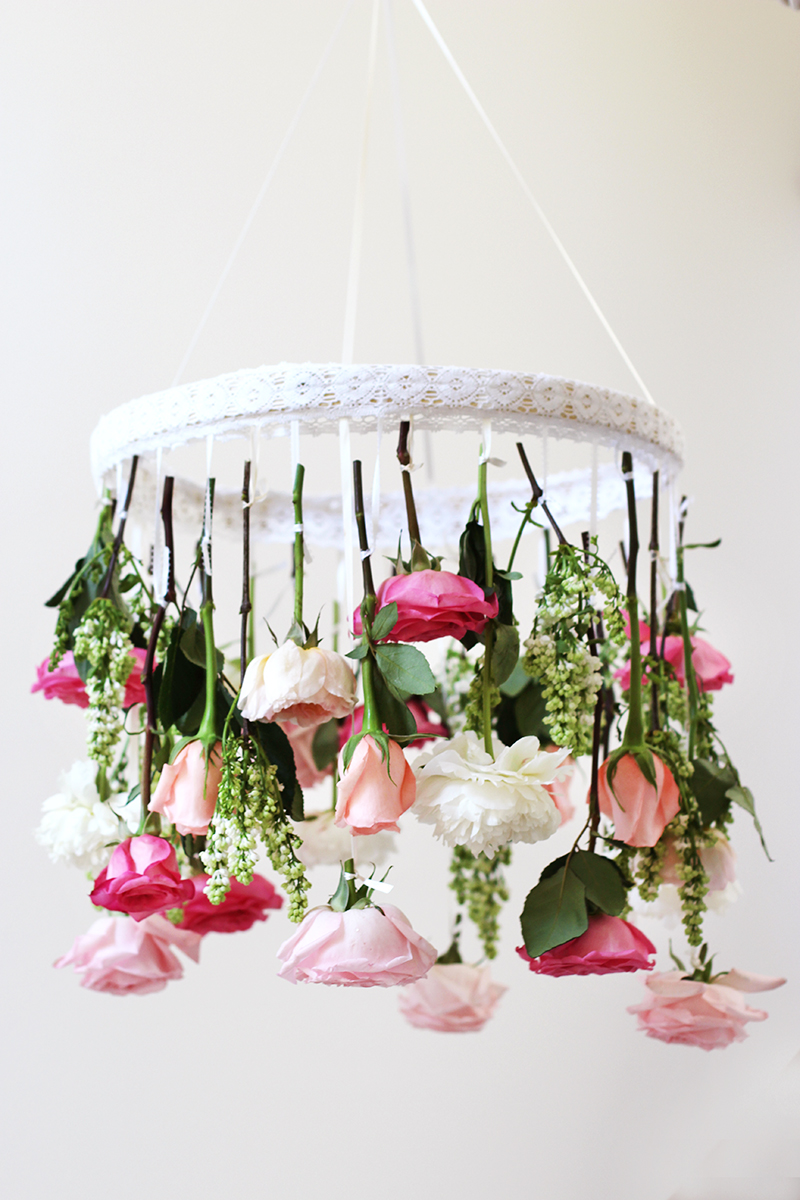
Hanging flowers are a beautiful way to decorate year-round, but especially capture the essence of spring. Love the idea of the above chandelier but want something a little smaller and simpler to bring inside? This look adapted from Better Homes & Gardens is for you! You’ll need either wreath form or an embroidery hoop, which you can spray paint or wrap in washi tape. While any color will do, we’d obviously recommend something spring-themed! Next, take some flowers with long stems. You can decide between real and fake flowers — real ones might look better, but won’t last as long as faux craft flowers. The choice is all yours. Using a needle and clear thread, put the needle through the end of one stem. Loop it around the hoop, giving the flower some space to hang. Double knot, trim, and continue with the rest of the flowers, spacing them out along the ring. From there, you can tie pieces that go across the entire diameter of the hoop to hang it with!
Celebrate Spring With Project Home DIY
At Project Home DIY, we believe every season is one to be celebrated (though spring might be one of our favorites). That’s why we offer DIY home decor projects delivered right to your house each and every month! Our farmhouse-inspired pieces bring a warm, cozy, and fashionable style into your home — plus the ability to say that you made your decor pieces yourself.
When you sign up with Project Home DIY, you’ll receive a box with all of the materials necessary to build that month’s project. New subscribers also get a free bag of reusable supplies, and even access to our private Facebook group where we discuss DIY and so much more. Project Home DIY gives you the chance to make each season your own. Sign up today to start receiving monthly DIY projects, or purchase some of our past one-time boxes by clicking here!
Great ideas. Will have to try some of these. Really love the spring center piece with farmhouse flair.
Love the suggestions but pics would be great!
Leave a comment