


As the founder/owner and creative designer of Project Home DIY, I find inspiration all over the place for our monthly DIY projects. You can't teach DIY if you don't DO DIY and we do DIY! My husband and I love doing DIY projects around our house, which we just newly acquired and have an entire house to remodel! Our current home, our forever home, is my childhood home that iI grew up in. My grandfather built it in 1984, the last home he built before he passed in 1985. We moved in the day after I was born. I grew up here and my parents lived here until we moved in and then they moved across the street to my dads family ranch. It's been a whirlwind of a switch, but theres no way I was going to let this house be sold to someone else. We sit on 29 acres and are raising our kits in the same forts, bedrooms and trails my sister and I plowed through when we were kids! It's a blast seeing my kids on Christmas morning sitting in the same place I vividly remember 30 or so years ago! Now, to honor my late grandfather and freshen up each room of this home one by one. I'm excited to keep you posted along the way!
Check out our first room remodel, minus just painting the bedrooms this bathroom was the first big re-do. While completing this project and laying the tile in the shower, it really got me thinking about some of our future DIY monthly projects. I want to teach you how to do these types of things (obviously on a smaller scale) but relevant enough to be able to bring your newly learned skill into a bigger scaled room! Stay tuned!
Materials Used:
Shower Pan System- Schluter Kerdi Kit
Delta Ashlyn In2ition shower head
The Process: Began March 2, 2022


Yes, there's carpet in the bathroom which is pretty common in an 80's built house. Short elongated toilet and full tile shower/tub/backsplash/countertop. Much to our surprise when removing the tile, it had been adhered right to the sheet rock with not one leakage issue over the 38 years of use. Just goes to show you how overrated all this tile backer board and tile systems we use today are!
Day 1- March 2, 2022


The bathroom took us a full 16 days including enough time for mortar to set and grout to dry (or lort, read on later for that experience!) Day 1 we demoed and got everything out, tile removed and tub removed (the whole 600 pound cast iron tub). Prepared the floor with Kilz Primer, just because.
Day 2 & 3


Laid new sub floor and Durock to prepare for tiling. Re-plumbed in a new Delta valve using Sharkbite fittings (super easy way to plumb, but pricy). This took a while to complete as anyone knows pluming takes time. Framed out the new Niche for in the wall storage. Finished hanging all of the durock and placed the Schluter shower pan in. Cut the Schluter curbing to fit. Began working on corner bench by framing it out. This was an after thought as we knew we would want some sort of bench in there or toe piece to put your leg up on for shaving! This is my personal request and preference! Its so much nicer to have a place to put your leg up and shave! Toilet is just placed in there temporarily to check placement.
Day 4

There was a previous texture done on the wall that was like a smear texture. Looked great for the time, but it was time to remove it and go with the standard Orange Peel texture we do here in the west. I hand sanded majority of the texture off using a 80 Grit Sand Paper, Dewalt Hand Sander and kept the dust to a minimum while hooking up the sander to the Fein Dust Collection Vacuum. Spray textured the small space using the can Orange Peel spray which works great for a small space. Repainted using Sherwin Williams Crushed Ice color. I want to mention just because the color came from Sherwin Williams, I do not use Sherwin Williams Paint. I have done A LOT of painting over the years and 100% hands down prefer Clarks & Kensington paint from Ace Hardware. They look up this Sherwin William color and mix it, you can do that with any color and your favorite paint at your local paint store! You do not have to go with the brand the paint color is from! We installed a new Hunter Ceiling fan/light as well as one Lumary Can light, a smart light that can change into a million different colors and tones. We didn't do the smart can light for any reason specific, other than the fact that all lights are different color tones, this light you can match to match the existing lighting and you can even turn it red, blue, purple, a million different options all for fun! We can also dim it.

We finished framing and covering the bench with durock so it was ready to tile once all durcok seams were mudded.
Day 5 - March 7th

We mudded all of our seams with a thinset mortar to prepare for tiling. This must set up for 24 hours before tiling. This wait time between mortar and grout is KILLER!
Day 6 - March 8th


Installed the ThermoTile Electric In-Floor Heat mat for under the tile. This is the only heat in the bathroom as we removed the electric baseboard heat that was previously there. We used a Mysa Electric In-Floor heat thermostat to go with this tile mat. The tile mat was super simple to lay down, just cut the mesh to fit and keep the wire unharmed. Read more about instillation on the Thermsoft Website. Installed the
Shower Floor Tile & main
Floor Tile. We used 1/8" spacers in the floor tile.
Day 7--GROUT DAY-- Let the games begin- March 10th

Oh gosh, to say this was a learning experience is an understatement. Epoxy grout is NO JOKE and not good for an unexperienced grouter. You can really really make a mess if you don't know what you're doing. Its messy and sticky and gets everywhere. It's like cleaning off oil with water. We used
Tile Grout Epoxy Mapei in White color. I chose epoxy grout for the durability and the fact that it doesn't stain. I figured if Im going with white grout, I need a grout that wont stain and that will stay white. The finished grout is amazing and HARD! It's there to stay, but getting there is difficult. You must grout in very small areas at a time and wash off immediately and clean you water every time you wash a section. We literally washed every three tiles and changed the water. A tiny bit of dish soap in each water bucket did help break up the epoxy scum, but it was still a lot of work. Let sit over night and if the tiles are still tacky, wash again with soapy water.
Day 8 - March 11th

Installed the Vanity 42" Gray color. This vanity is a super high quality vanity and top set with soft close doors. The drawers are a little difficult to open but will break in and work perfectly! The soft close is very nice so drawers cant be slammed shut. The hardware that came with it was silver. I used a metal spray paint and painted the hardware black. Installed
Light Fixture &
Mysa Thermostat for heated floor.
Day 9- March 12th


I mean... what else could I ask for on my birthday! This is what I LOVE to do!
Cut and installed the wood accent wall. This wall was made from 1/4 birch plywood, cut and installed to fit. We used a nail gun to install each cut pieces, filled nail holes and seams and painted same wall color over the wood. This accent wall will be used to hang towels on.
Day 10- March 13th


Shower tiling began which was pretty uneventful but productive. Matt made all the cuts, I laid the tile. We used 1/8" spacers again. Make sure to set your spacers at the ends of each tile and not towards the center. This helps keep your tile straighter. We would check for level every few rows and adjust accordingly. We only got halfway done tiling that day and had to take two days off for other events going on.
Day 11- March 16th


Finished tiling the shower wall.
Day 12- March 18th


Grouting Shower Walls. We had a game plan this time. I was the water runner, we used 3 buckets of warm water with soap, Matt would grout three rows of tile on one wall and wash immediately. Once the full wall was completed we washed it down fully again to get more of the grout scum off the wall. We covered the floor in contact paper to help clean up grout as we went.
Clean up is crucial to using epoxy grout. Clean a lot and very very often using new water each time. Have plenty of tiling sponges as well! We went through 4.
PS-- he ALWAYS smiles, no matter how difficult the task is!
Day 13- March 19th

Installed towel ring, toilet paper holder and sink faucet. This was the first faucet I installed all on my own and it was really simple to follow and do! The cold water valve needed to be replaced so Matt had to do that part before we could turn the water on. BUT! The kids got to brush their teeth in the new bathroom! We used all Delta Ashlyn faucets and accessories in this bathroom. The toilet was also installed. This took a lot of work as the existing plumbing was too low because of the old carpet flooring and now with new sub floor, durock and heat mat & tile the floor was too high. We had to extend the plumbing from underneath to reach the toilet appropriately.
Day 14 (TWO WEEK MARK)- April 1st

NO JOKE! We left for a week on a vacation and then a back to back work trip left us from completing the bathroom any sooner!
We installed the shower doors. Thoughts on shower doors. Instructions are a pain in the ass. No words, just diagrams. We installed the exact height we were told to, but it seems the doors are 1/4" too high and water gets under them very easily. We will need to lower the doors by 1/4" to fit better and less water leakage. We did end up lowering the doors down another 1/4" which helped with the water coming underneath. There is a video on YouTube that explains the soft close mechanism and how it should work if you're struggling. We have made the door on the left stationary which you can do by just tightening the soft close brackets and Ill order black door plugs to remove the towel bar on that side as its no longer needed. The left door will remain stationary and we will add some sort of water seal to the bottom. We have ordered new knobs from Amazon so there is more of a knob to open and close door on right. We will insert this knob right into the fitting of the existing handle.
We installed the Shower Faucet as well. We used the Delta Ashlyn In2ition shower head with the hand held shower sprayer that detaches from the shower head. We did remove the flow restrictor o-ring in the shower head to allow for more water flow and this did help! I also added a black suction cup handheld holder separate so my son can reach the hand held and keep it separate from the main shower head. This also allows you to move the handheld around the shower (mount on shower glass door) and have two shower heads for dual showering. I LOVE the idea of this movable holder, but the holder itself doesn't angle down enough for this handheld. I will continue looking for another suction cup holder. I don't want anything stationary so we can move it around as pleased. The refillable shampoo/conditioner/body wash bottle are awesome too!


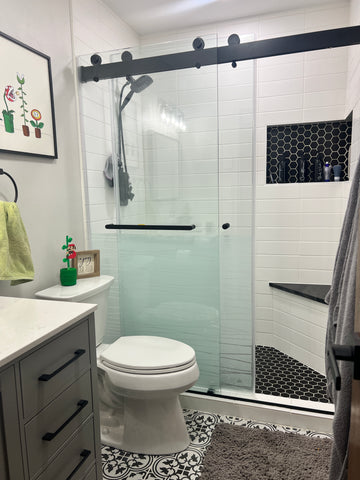
FINISHED! We are in love with the finished bathroom!
Here is a quick walk around. We have a bathroom closet behind the door in there that needs finished with our closet wood maker guy which you see a bit of in the video. We have not decided on a wood stain color that we will use throughout out the house so this is only hold for right now. We will also replace the main door once we decide what doors we want for the whole house further down the remodel.
Until next remodel... thanks for browsing! Let me know if you have any questions!
UPDATE!-- Shower door film

You all know what a nightmare it is keeping water spots off the glass and from building up over time, this is our solution! This is our kids' shower, they aren't going to squeegee down the glass after each shower and the water spots are REAL big pain to clean! Our last all glass shower ended up not looking so sparkling clean after a couple of years so I wanted to prevent that on new doors. I used this window film from Amazon on the INSIDE of the shower doors. It's easy to apply. The 35.4 x 78.7 roll did both of our 31" wide doors x 36" tall coverage. It is not sticky, more like a static cling which is nice because once we want to remove it, wash behind it and put it back on, we can easily! Its applied by getting the glass wet and using a flat edged window squeegee to smooth it out! Took me a whole 20 min. Highly recommend. As long as people just leave it alone, it will serve its purpose! They do have different designs you can purchase as well, would be kind of fun to change them every couple years!
Enjoy and feel free to comment or ask anything!
Leave a comment